How to Post a Carousel on LinkedIn (Step-by-Step)

Oct 14, 2024
Looking to add a dynamic touch to your LinkedIn presence? Want to share your insights in a more engaging format? Uploading a carousel on LinkedIn might just be the answer! Carousels allow you to share multiple images or slides in one post, making your content more interactive and visually appealing. Let’s dive into how to upload a carousel on LinkedIn and explore the best practices to make your posts shine!
What Are LinkedIn Carousels?
So, what exactly is a LinkedIn carousel? In simple terms, a carousel is a post that lets you showcase multiple images or documents that viewers can swipe through. Think of it as a digital slideshow right in your feed!
These carousels can include a variety of formats, such as:
Images: High-quality photos that tell a story or illustrate a concept.
PDFs: Document slideshows that can provide in-depth information or reports.
Infographics: Visually compelling graphics that summarize key data or insights.
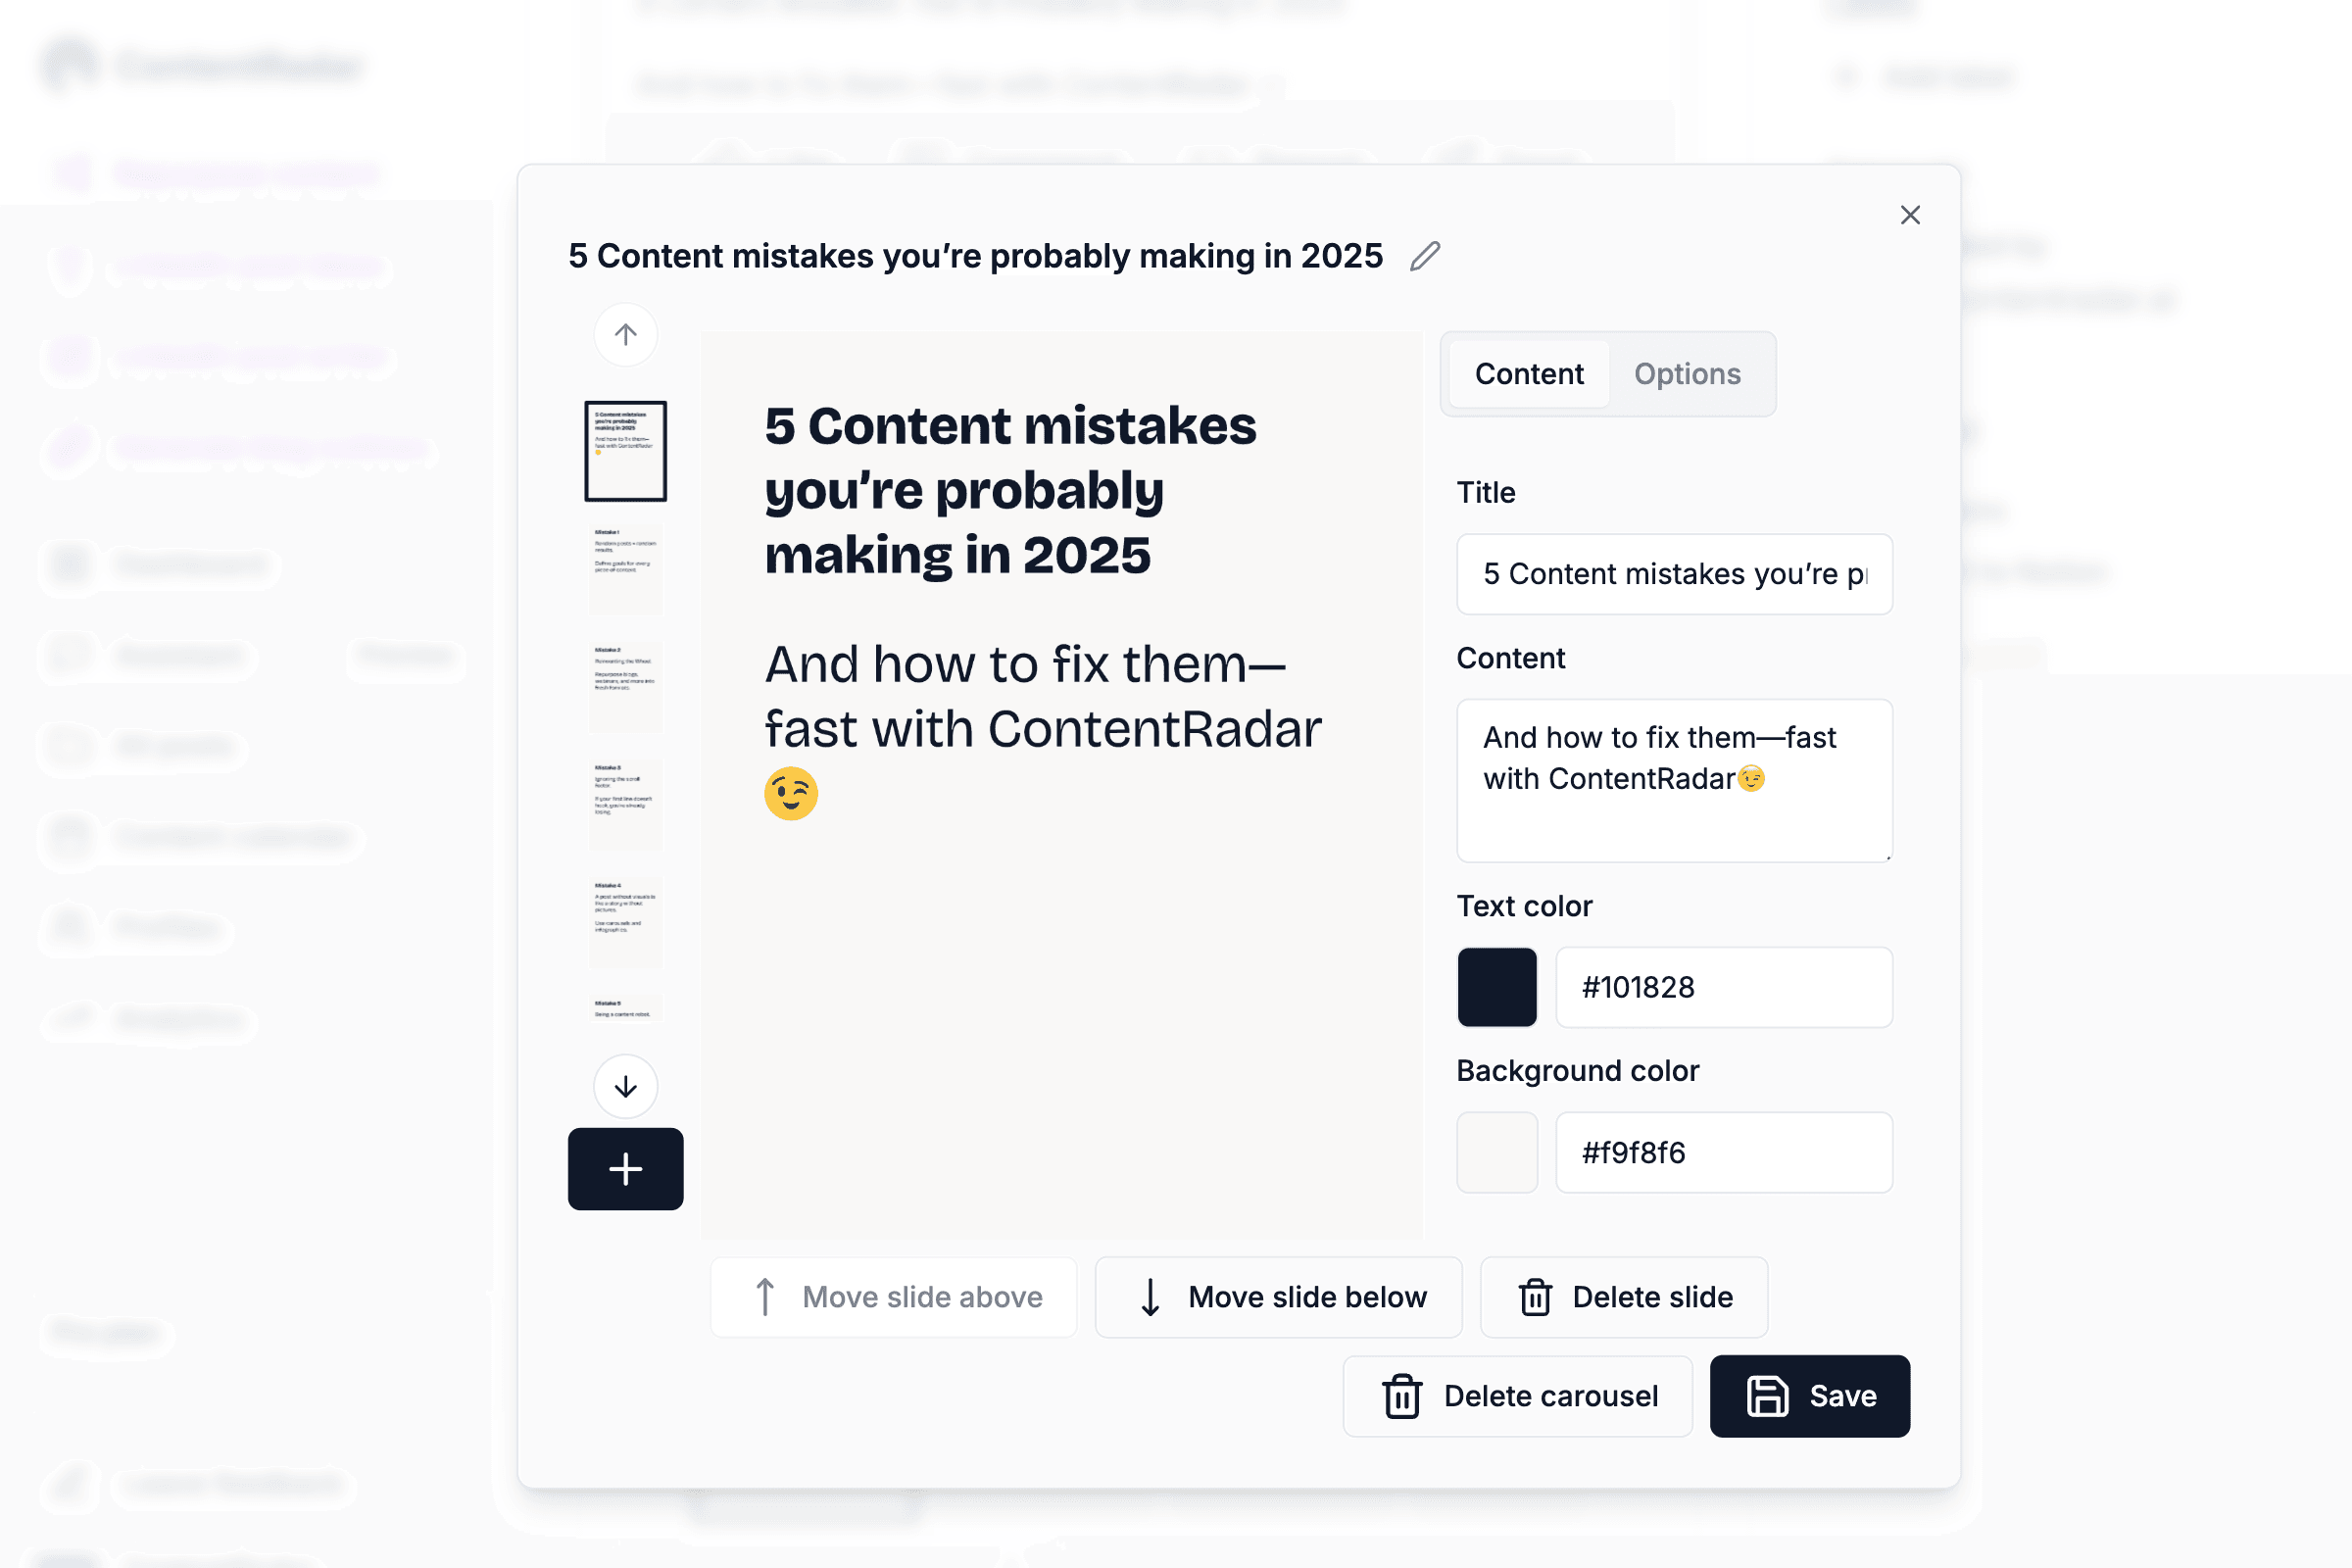
Carousels are a fantastic way to engage your audience. They’re not only visually appealing but also allow for a deeper exploration of topics. Have you ever seen a post that grabbed your attention and kept you swiping? That’s the power of carousels!
Why Should You Post LinkedIn Carousels?
You might be wondering, “Why should I bother with carousels?” Here are some compelling reasons to consider:
1. Increased engagement: Carousels encourage users to interact with your content. As they swipe through the slides, they’re more likely to spend time on your post, increasing engagement rates.
2. Better storytelling: With multiple slides, you can tell a more complex story or present detailed information without overwhelming your audience in a single image or text block.
3. Higher visibility: LinkedIn’s algorithm favors engaging content. Carousels can help you stand out in your connections’ feeds, leading to more views and interactions.
4. Versatility: Whether you’re sharing tips, case studies, or company updates, carousels can be adapted to fit various content types, making them a versatile tool in your LinkedIn strategy.
5. Showcase your expertise: By creating informative carousels, you position yourself as a thought leader in your industry, sharing valuable insights and knowledge with your network.
Ready to make your mark? Let’s get into the nitty-gritty of how to upload a carousel on LinkedIn!
How to upload a LinkedIn Carousel
Uploading a carousel on LinkedIn is a straightforward process. Here are two options for creating LinkedIn carousels, with a deeper dive into each:
Option 1: Use Designing Software Like Canva, PowerPoint, or Google Slides
Step 1: Choose your software. You can pick from various design tools based on your comfort level:
Canva: Known for its user-friendly interface and a plethora of templates, Canva is ideal for those who want quick, professional designs.
PowerPoint: A classic choice, PowerPoint offers extensive features for creating slideshows with animations and transitions.
Google Slides: Perfect for collaboration, Google Slides allows multiple users to work on a carousel simultaneously.
Step 2: Design your slides
Select a template: Most of these platforms offer templates specifically designed for social media posts. Choose one that suits your theme.
Customize your content: Add images, icons, and text. Keep your design consistent with your brand colors and fonts.
Use visual hierarchy: Ensure that the most important information stands out. Use larger fonts or bolder colors to highlight key points.

Step 3: Export your carousel
Once your design is complete, export your slides as a PDF. This format allows for easy uploading on LinkedIn and maintains the design integrity.
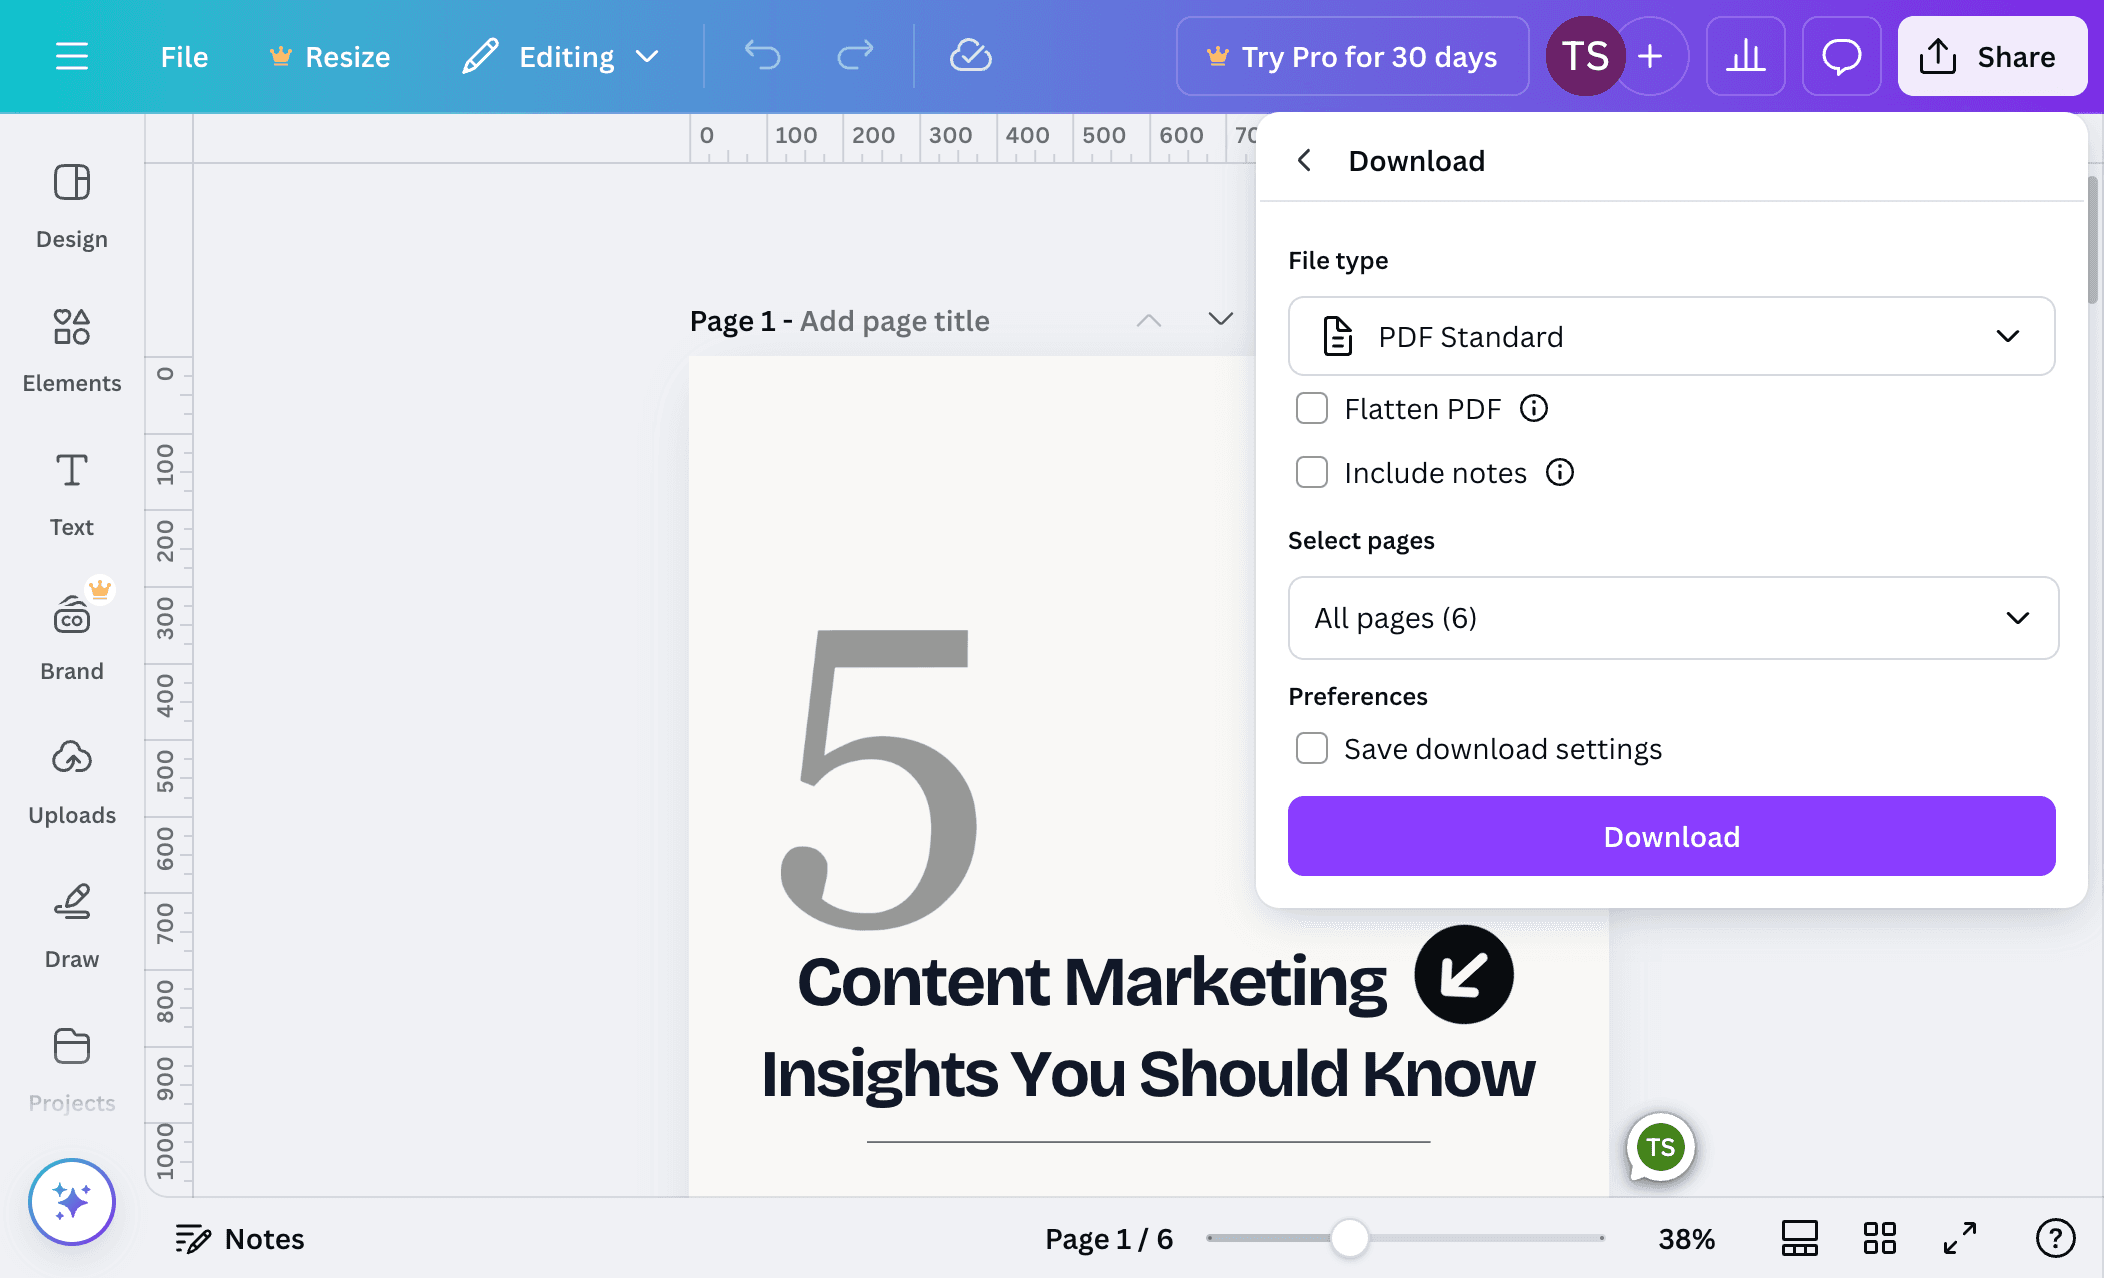
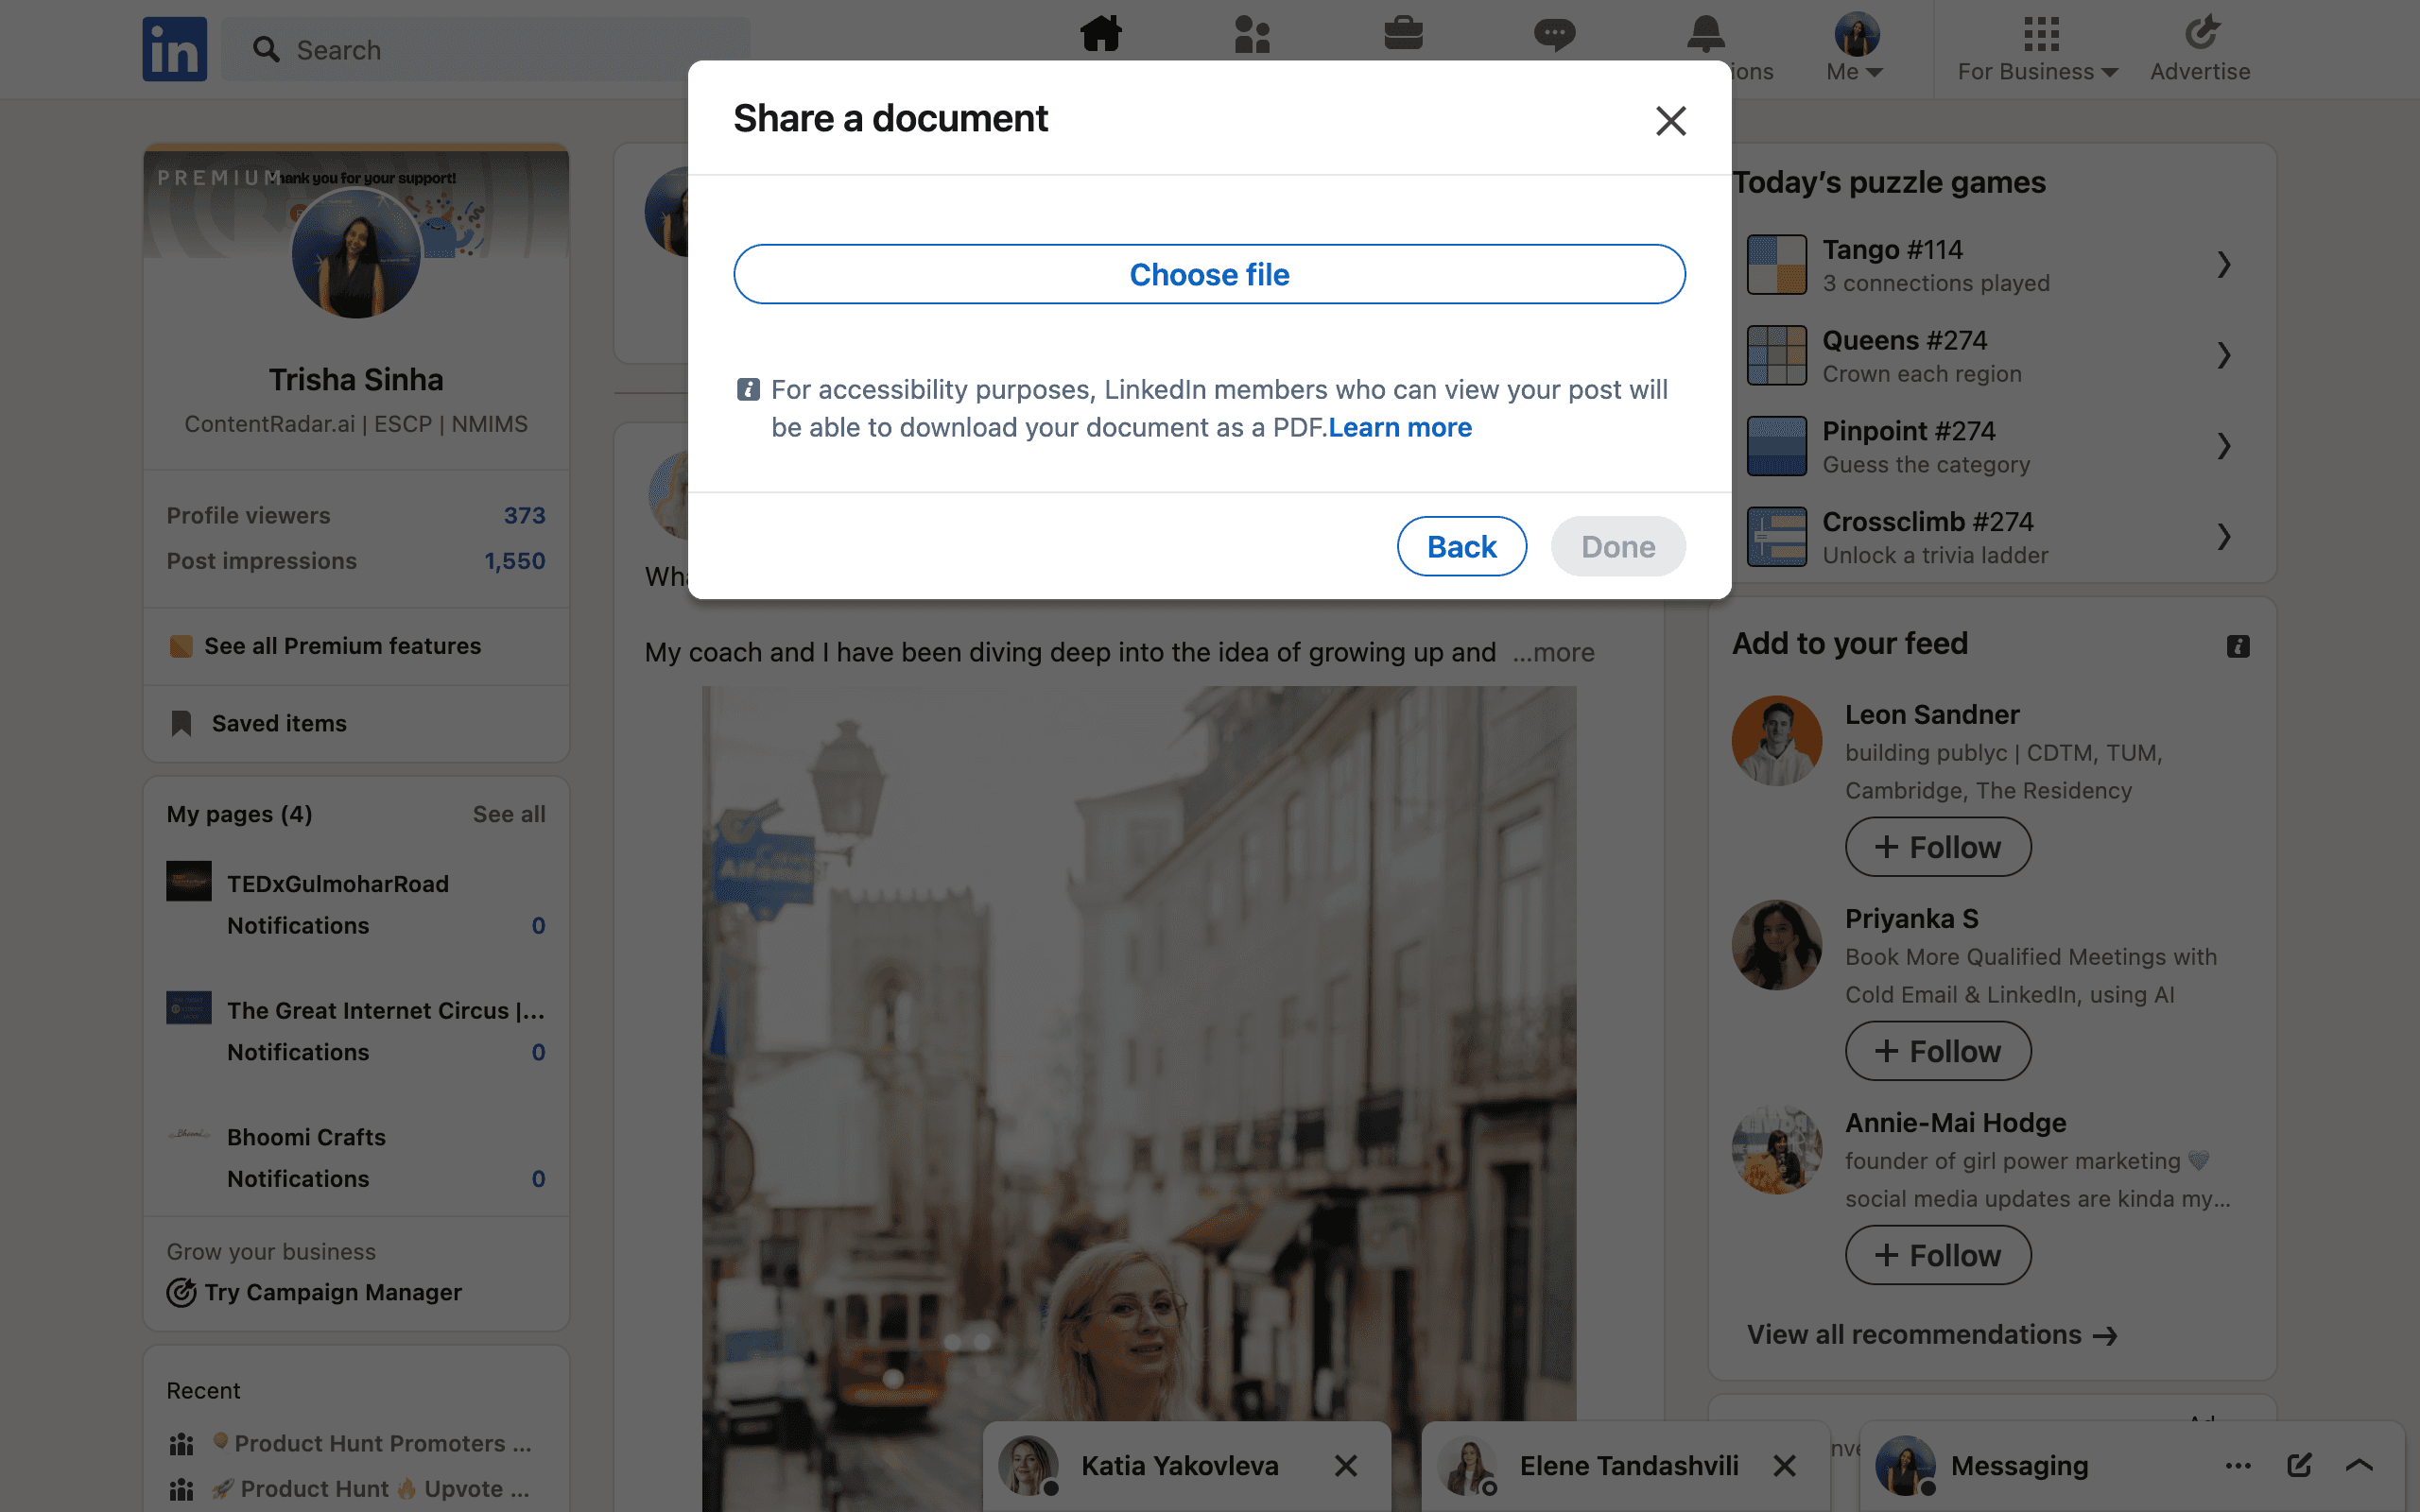
Step 4: Upload Your PDF
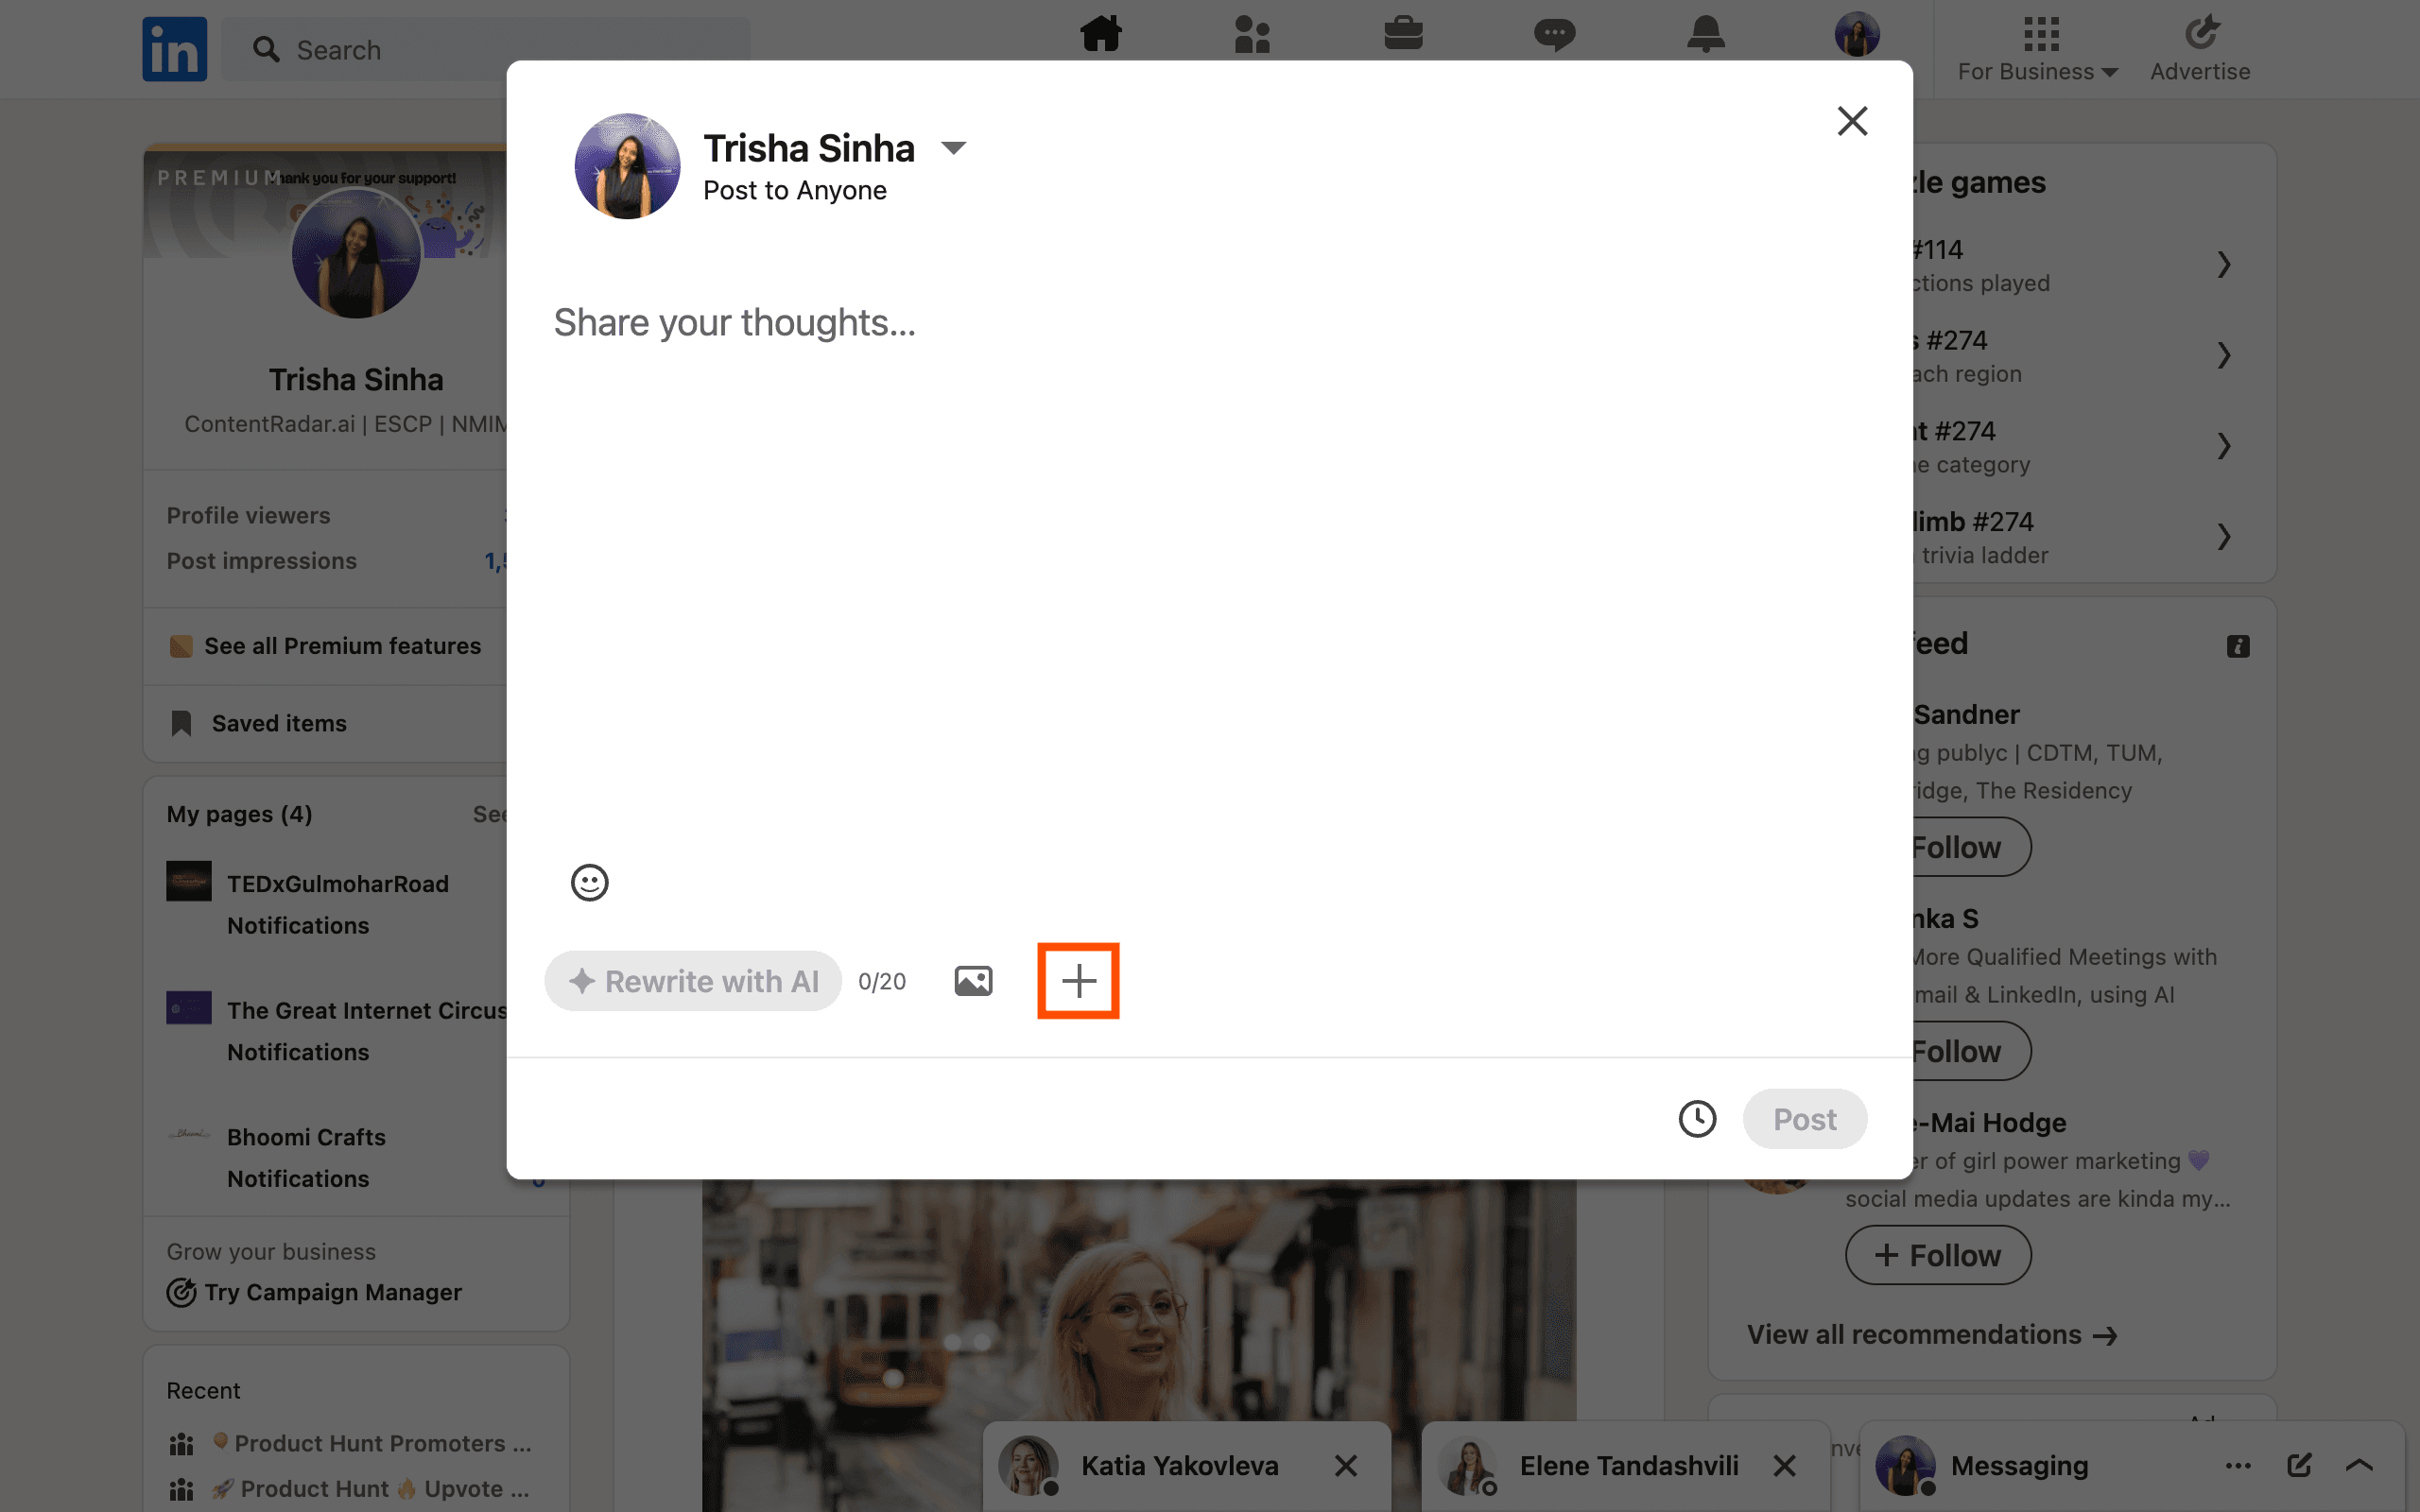
Create a post on LinkedIn: Click on "+" sign
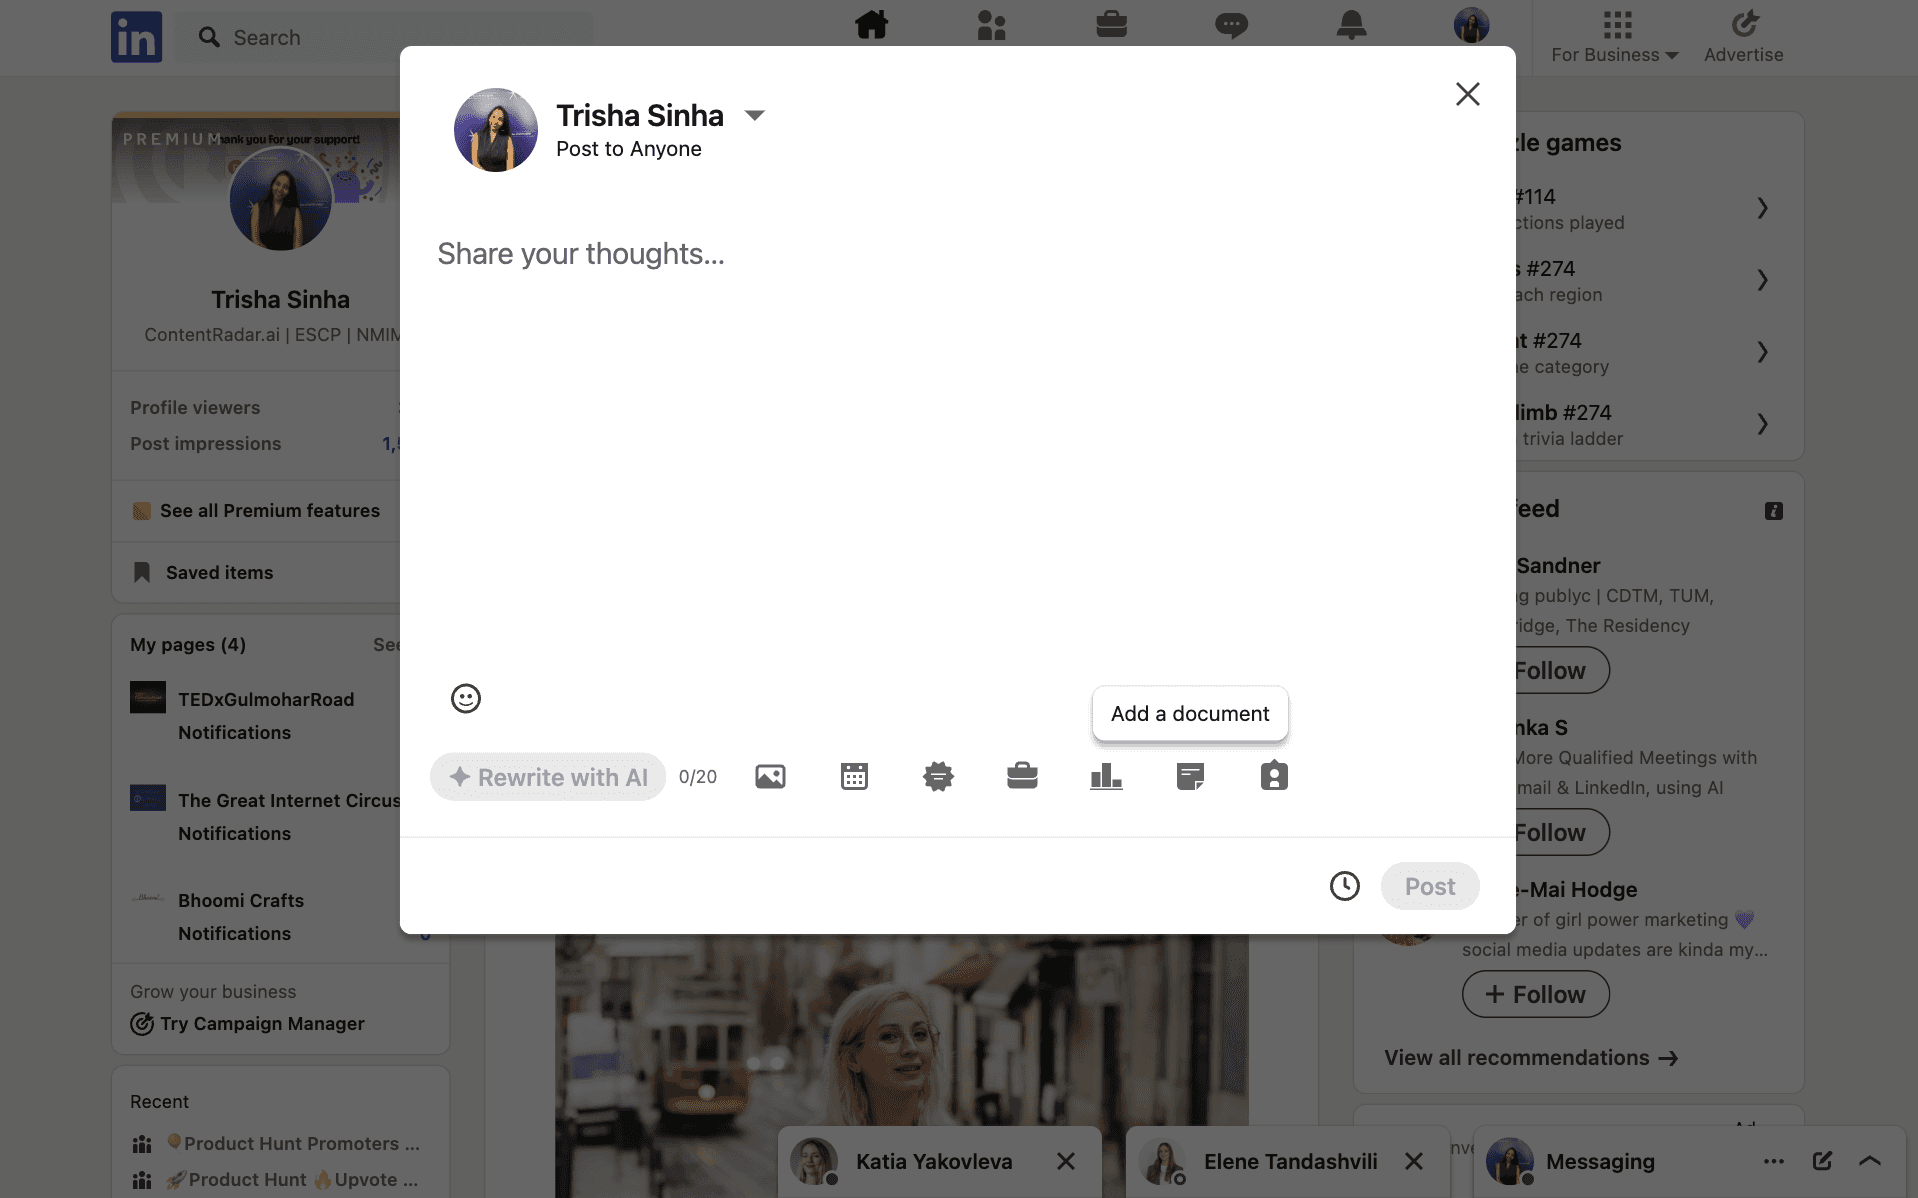
b. Choose document: Click on the ‘Document’ icon in the post creation window.
c. Select your file: Choose the PDF you created and click ‘Open’.
Step 5: Add a catchy title
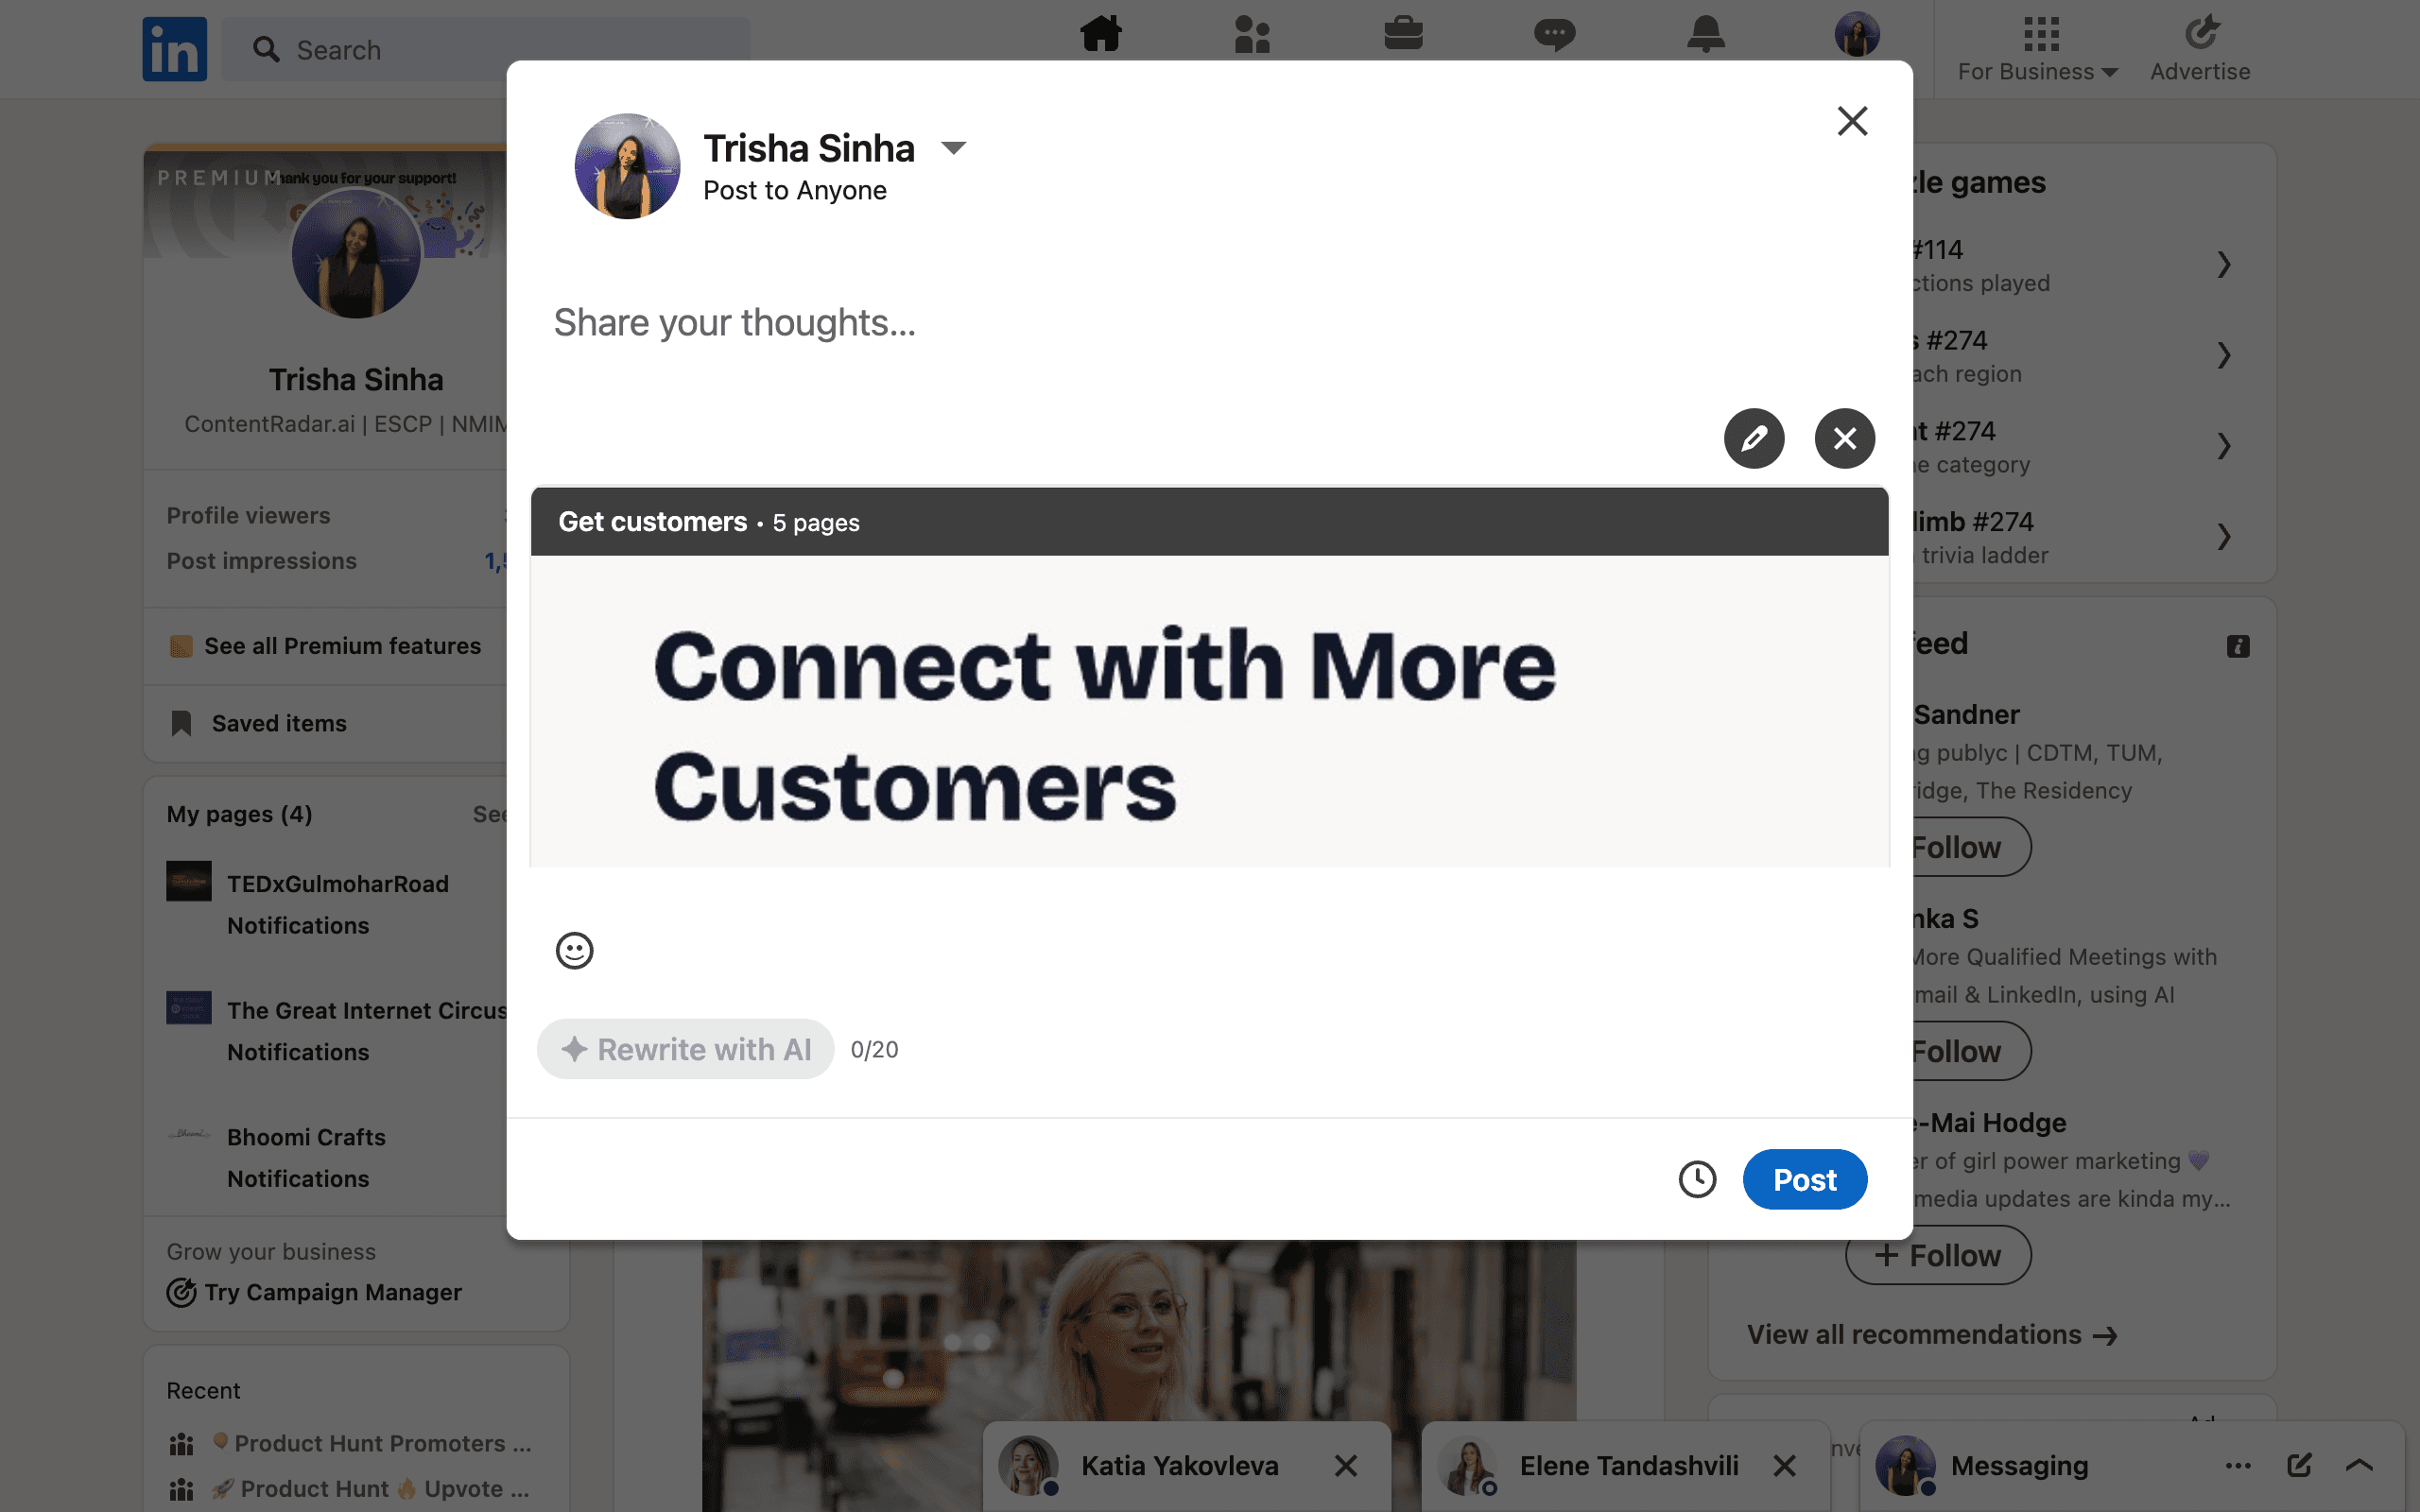
LinkedIn will prompt you to add a title for your document. Make it engaging and relevant to your content. This title will be visible to users as they scroll through their feeds.

Step 6: Write a description
Next, write a brief description or introduction to your carousel. This is your chance to hook your audience and encourage them to swipe through your slides. Include relevant hashtags to increase visibility.
Step 7: Post It!
Once you’ve filled out the title and description, click ‘Post’ to share your carousel with your network. Congratulations—you’ve just uploaded your first LinkedIn carousel!
Benefits
Full Control: You have complete creative freedom to design your slides exactly how you want.
Rich Features: Design software often provides more advanced features, like animations and detailed graphics.
Considerations
Learning Curve: Some software may require a bit of time to master.
Time-Consuming: Designing from scratch can take longer than using a template or AI tool.
Option 2: Use AI carousel generators
For those looking for a quicker and often simpler way to create carousels, AI carousel generators can be a game changer. Here’s how you can leverage them:
Step 1: Choose an AI Carousel Tool.
Several platforms specialize in generating carousels using AI technology. In this article, we take ContentRadar as an example to illustrate the process.
Step 2: Draft your LinkedIn post from scratch or save time by repurposing your pre-existing content into LinkedIn post.
Click on “Plain text + Carousel”.
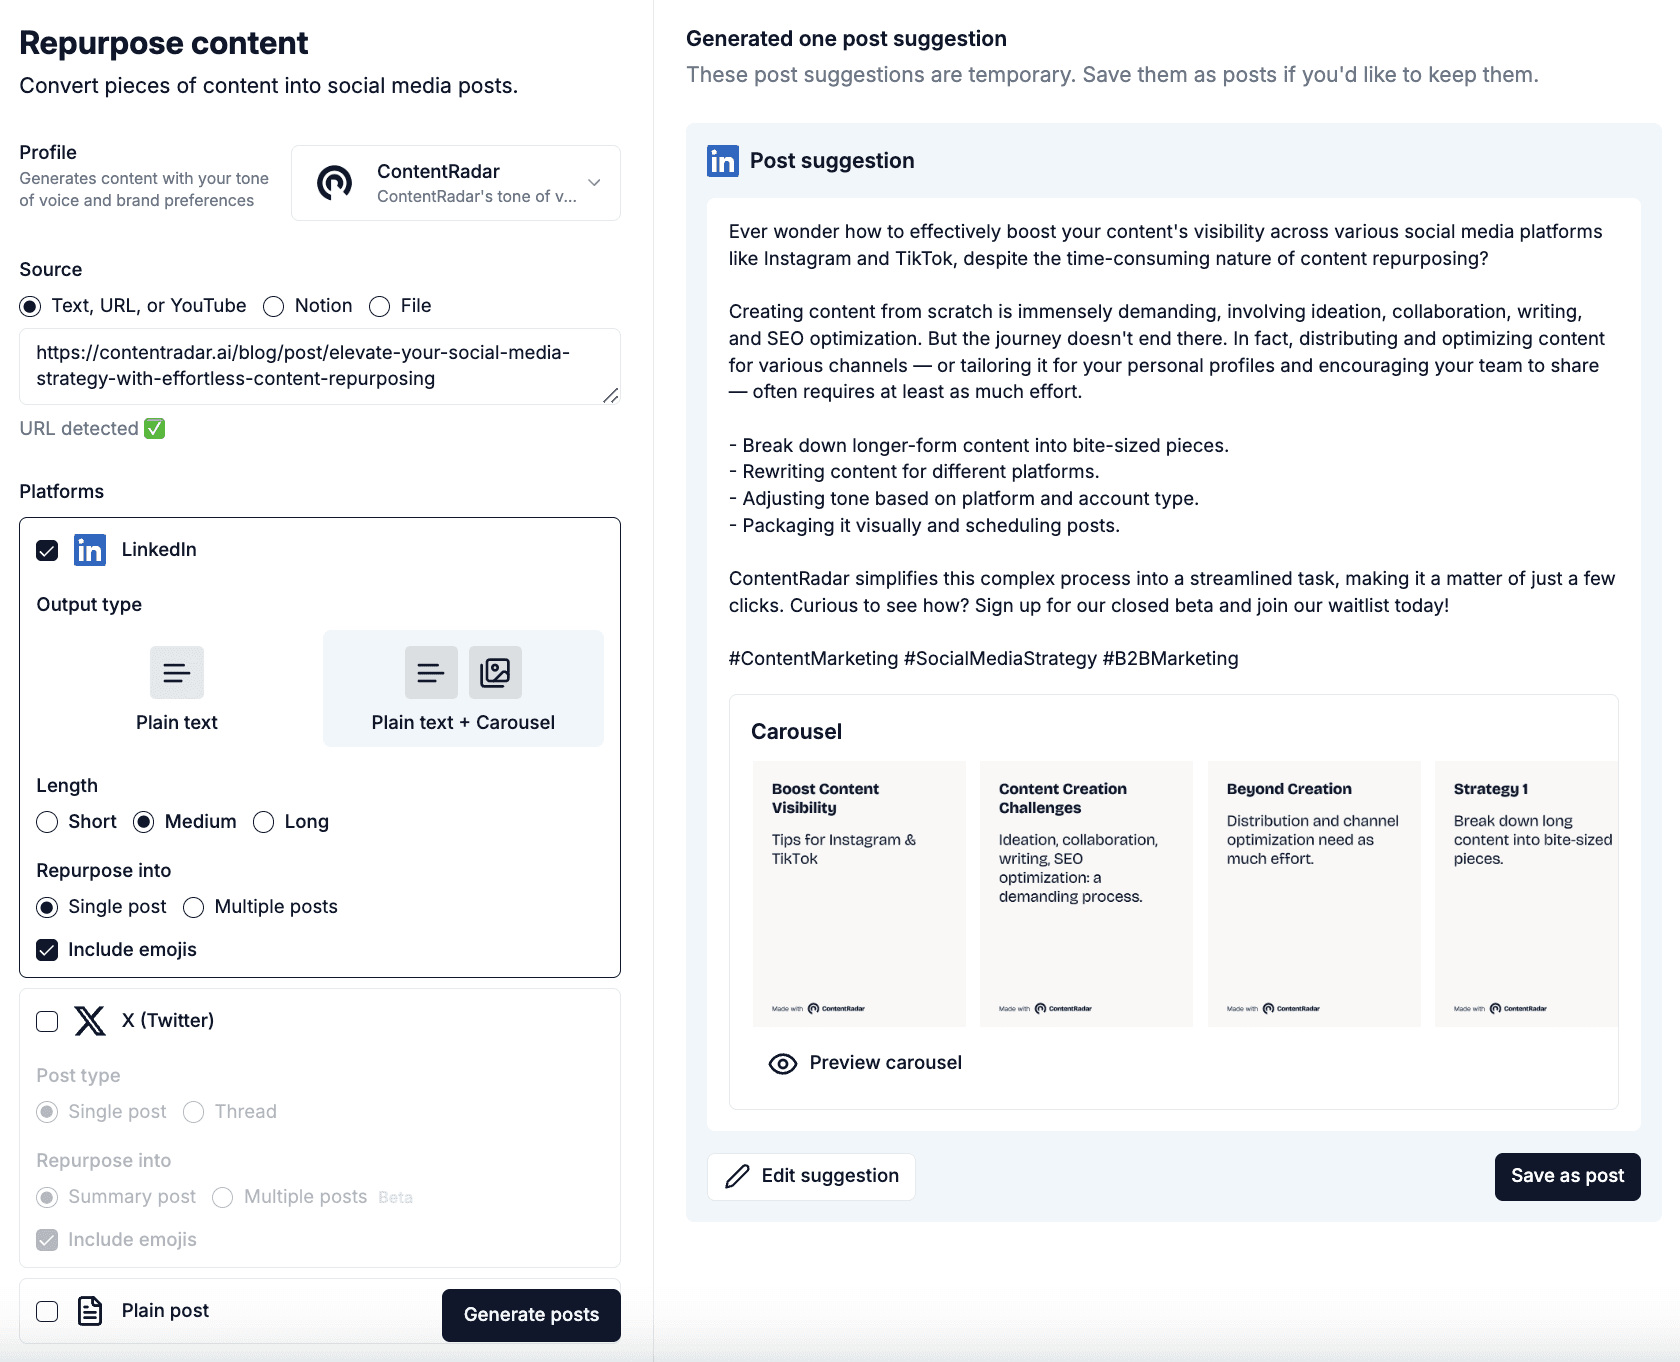
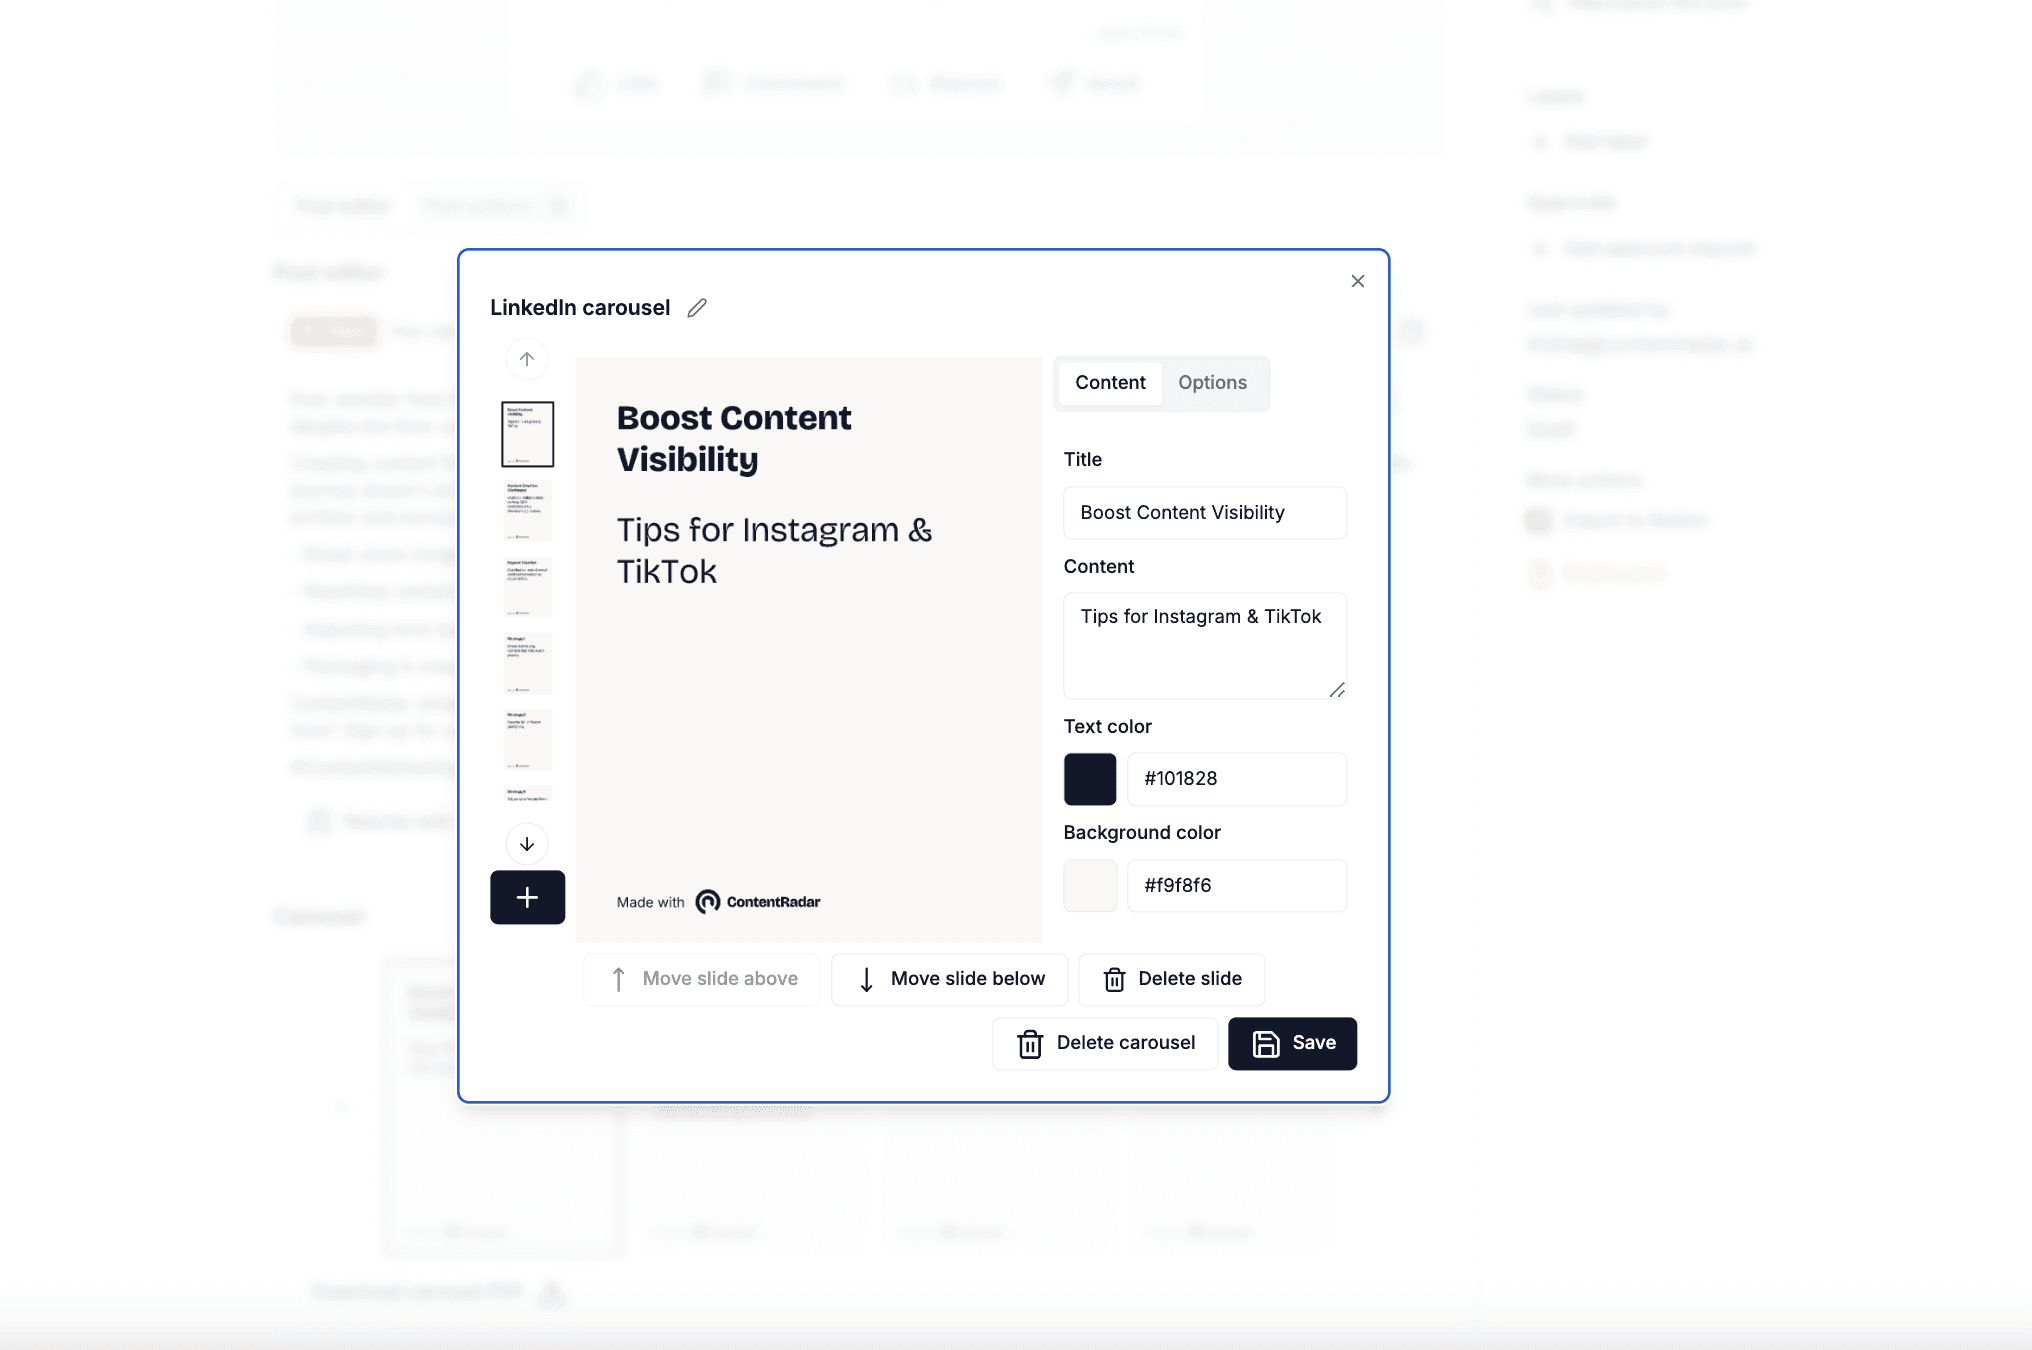
Step 3: Click on "Save as post" on the bottom right.
Edit your carousel to your liking by changing colors, font or by adding author's profile.
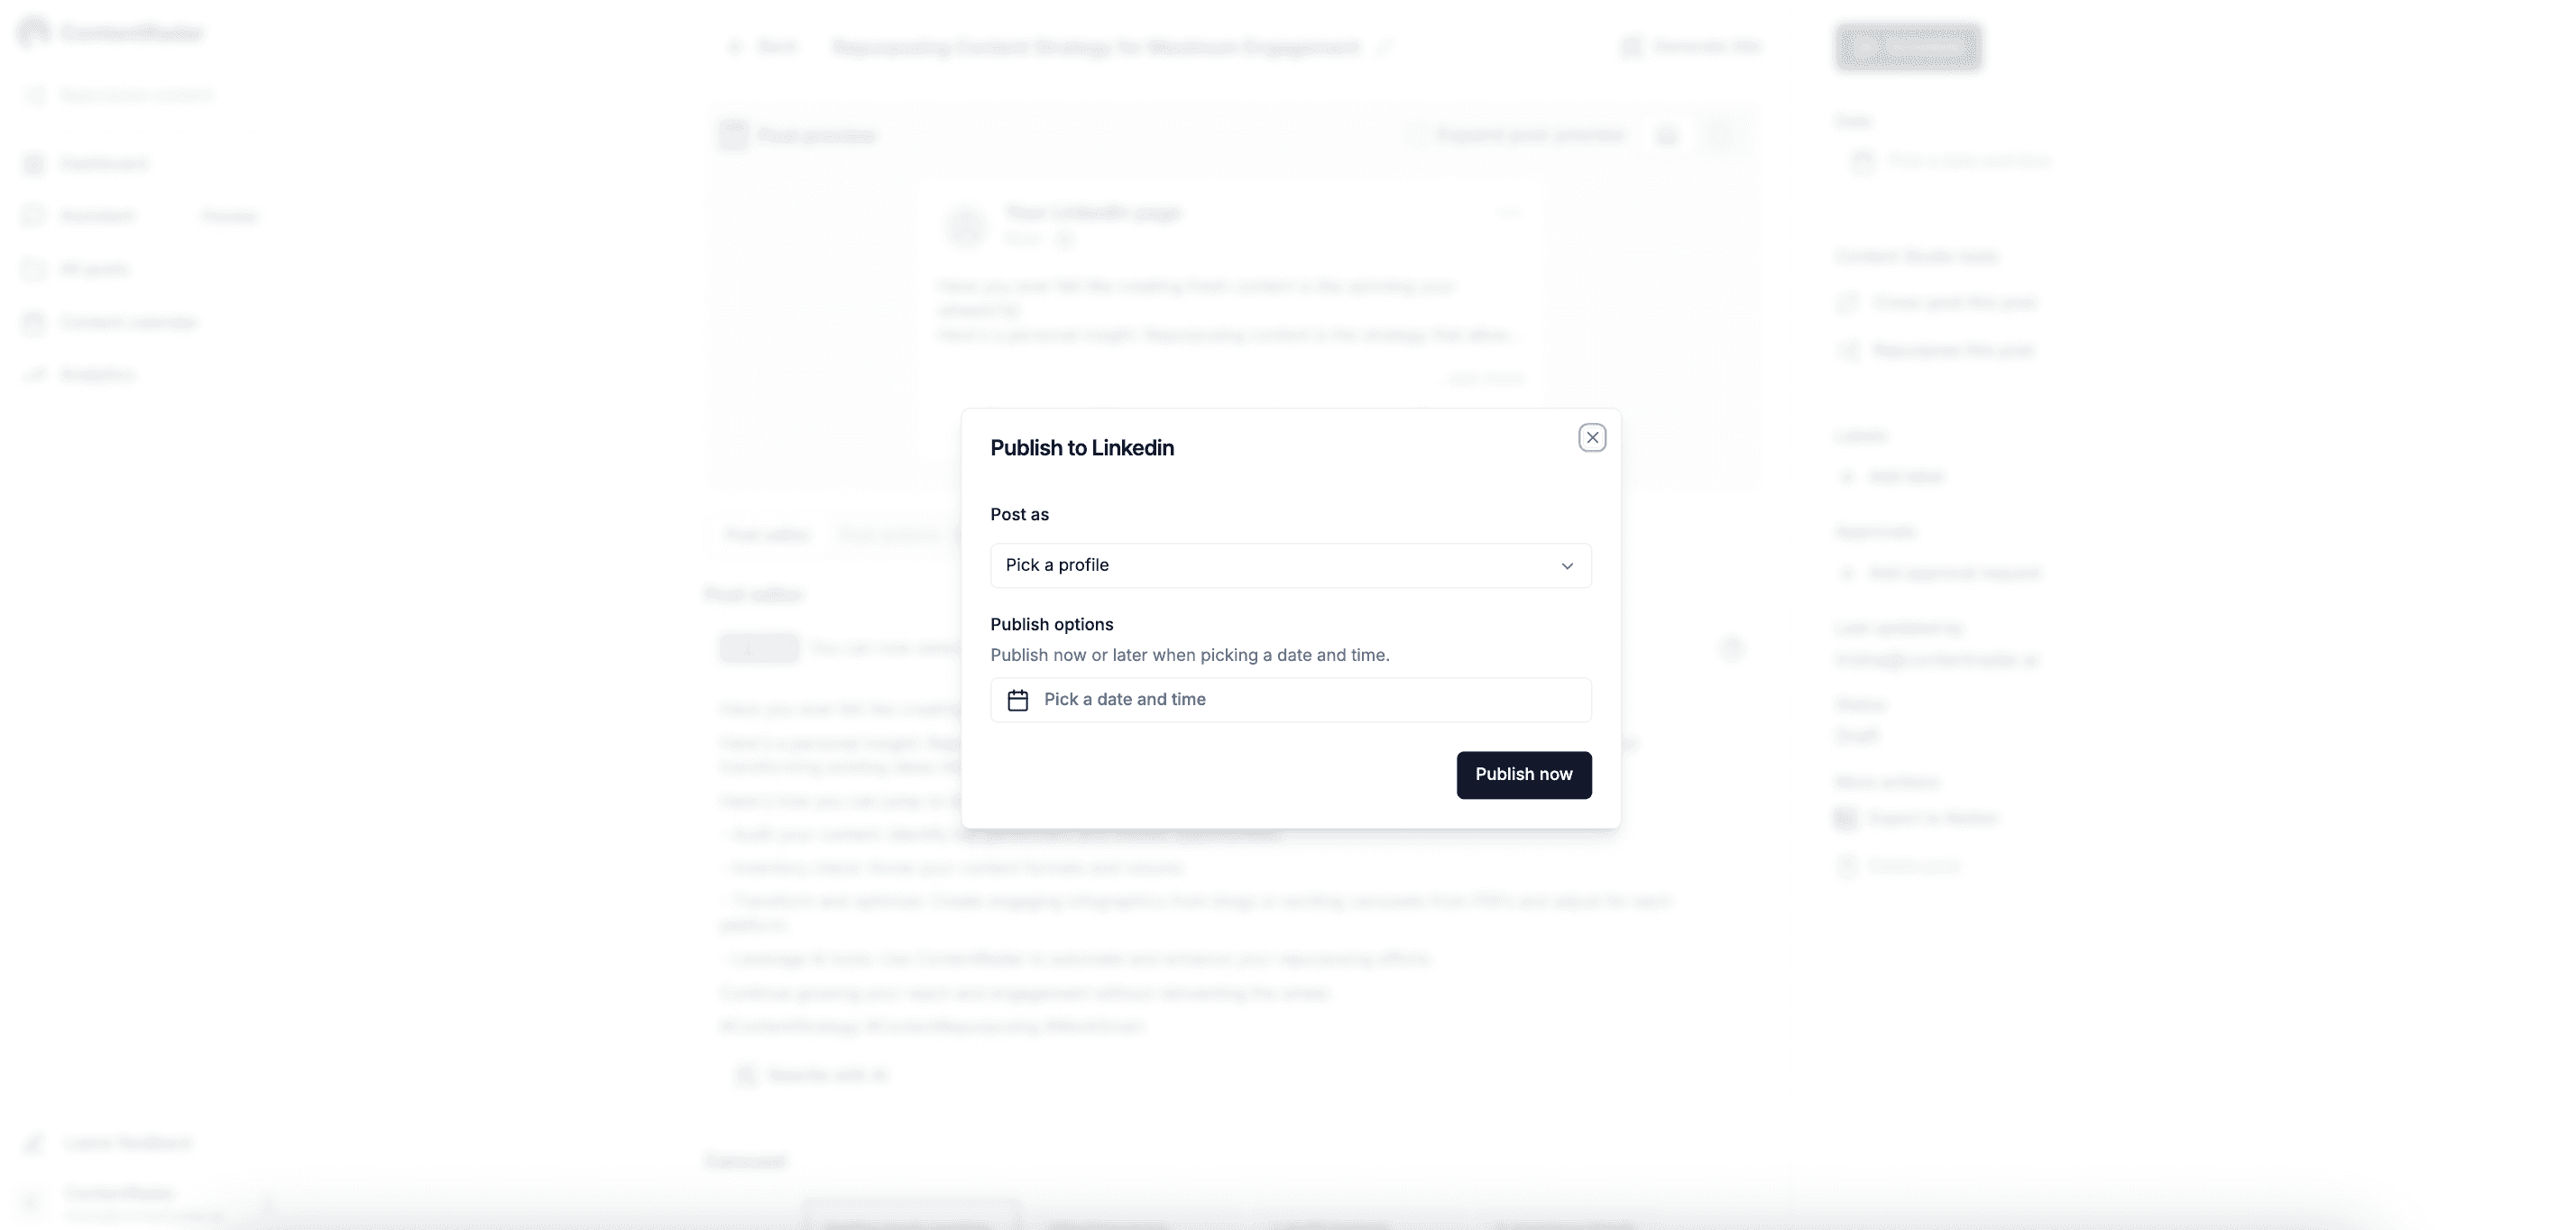
Step 4: Click on "Schedule" on top right corner.
Choose your preferred date, timing and profile. Hit the "Publish now" button and now your carousel is ready to be posted in no time.
Best practices for LinkedIn Carousels
Creating a successful carousel is more than just uploading slides. Here are some best practices to keep in mind:
1. Focus on design - Each slide should convey a clear message without overwhelming viewers with too much information.
2. Optimize for mobile - Many users access LinkedIn via mobile devices. Ensure that your slides are easy to read on smaller screens.
3. Tell a story - Craft a narrative throughout your carousel. Each slide should build on the previous one, guiding viewers through your message seamlessly.
4. Engage with your audience - Encourage interaction by including questions or calls to action in your slides. For example, you might ask, “What are your thoughts on this?” or “Swipe to see the next tip!”
Summary
Uploading a carousel on LinkedIn is an excellent way to engage your audience, share valuable insights, and enhance your professional presence. With the ability to tell stories through multiple slides, carousels allow for a deeper exploration of topics, making your content more impactful.
By following the steps outlined in this guide—preparing your slides, uploading them, and adhering to best practices—you can create carousels that capture attention and drive engagement. Plus, don’t forget to explore how AI tools can assist in your carousel creation!
So, are you ready to take your LinkedIn game to the next level? Start creating and uploading carousels today, and watch your engagement soar with ContentRadar!
Running out of ideas? Find a list of ideas to make yourAI -powered carousel standout!
Other articles

How to Block (and Unblock) Someone on LinkedIn
And When You Should
Discover how to effectively block and unblock someone on LinkedIn to maintain your professional space and privacy. This guide covers the reasons for blocking, step-by-step instructions for both blocking and unblocking, and the difference between blocking and disconnecting. Learn to manage your LinkedIn network confidently and ensure it remains a supportive environment for your professional growth.
How to Schedule Posts on LinkedIn
and Make the Process Even Easier with ContentRadar
Discover how to effortlessly schedule posts on LinkedIn to boost engagement and maintain consistency. Learn the benefits of scheduling, step-by-step instructions, and how ContentRadar can streamline your content creation and posting process. Maximize your LinkedIn presence with smart timing suggestions and AI-generated content!
How to Save LinkedIn Posts and Find Them Again
Master the LinkedIn Save feature with our quick guide! Learn how to bookmark posts, job listings, and insightful content for easy access later. Discover the benefits of saving posts, how to find your saved items, and tips for managing your saved content effectively. Stay organized and never lose track of valuable information again!
